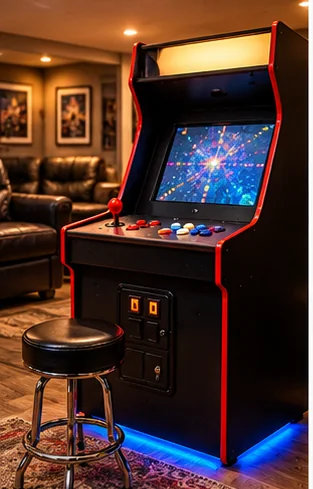
What T-molding is and why edges fail
T-molding is the flexible plastic trim that covers the raw edges of an arcade cabinet's panels. It has a flat head that shows and a stem with small barbs that sits in a slot routed into the panel edge. Replacing damaged T-molding is a modest job if you measure the slot first and buy a profile that matches it.
Edges fail for ordinary reasons. Cabinets get bumped during moves, trim dries and cracks with age, and a loose piece catches on clothing and pulls farther out. On a used cabinet, missing sections are a common sign of rough handling, so inspect the edges as part of any purchase, as the used machine inspection guide suggests.
Measure before you buy
Fit depends on a handful of measurements. Do not trust memory or a photo; measure the actual cabinet.
- Slot width: the opening in the panel edge that the stem sits in. Measure with calipers or compare against the old trim's stem.
- Panel thickness: the head covers the edge, so it must be wide enough to cover the panel and any laminate
- Head shape: flat, rounded or with a small lip, which changes how it looks and how much edge it covers
- Stem shape: barbed stems hold better; smooth stems rely on adhesive
- Total length: measure the whole run of every edge, and add spare for corners and mistakes
Save a piece of the old molding as a sample. Compare any new profile to it side by side, and read the seller's size chart carefully. Sellers describe profiles in different ways, so ask a question before ordering if a listing does not clearly give slot size and head width. If your cabinet came from a maker, check the maker's parts information too.
As an eBay Partner, I may be compensated if you make a purchase.
Choosing a profile and color
Black is the safe choice and hides scuffs, and it suits most cabinets. The wiki also advises checking whether the cabinet has molding on the back, and not changing the color on an original game cabinet. Colored molding can match the artwork or panel color, but it shows dirt and chips and is harder to match if you need more later. On a restoration, matching what the cabinet originally used keeps it looking right. On a custom build, pick what suits your artwork.
Buy a little extra of the same batch. Colors differ between production runs, and ordering more later may not match. A short spare also covers a corner that goes wrong the first time.
Removing the old molding
- Start at a corner or a loose end and pull slowly, keeping the pull parallel to the panel.
- If the molding is stuck, work a plastic scraper or putty knife under the head instead of yanking.
- Clean out the slot with a thin tool or a soft brush so dust, glue and broken stem pieces do not block the new trim.
- Inspect the slot. If an edge is chipped, a wide slot is no longer holding, or the wood has swollen, it needs repair before the new trim will hold.
- Keep the old piece as a sample.
Take care with artwork near the edge. Pulling trim can lift vinyl or paper near the panel edge, so test an inconspicuous spot first.
Installing the new molding
Dry-fit a short section first to confirm the stem sits properly. Start in an inconspicuous place, such as the lower back, and seat the stem by hand along the slot, finishing with light taps from a rubber mallet. A metal hammer can crack or mark the head, so use a mallet or a block of wood.
Corners need planning. On an outside corner, the trim needs relief cuts on its back flange so it bends around the corner without kinking, and on an inside curve the head can bunch up. The wiki describes notching the barbs for tight curves and warming the trim with a heat gun for moderate ones, and warming it beforehand in the sun or on a warm surface also helps. Keep any heat source moving and away from artwork, paint and the cabinet itself, and stop if the trim starts to soften too much or discolor.
On a used cabinet, expect to need adhesive. The Arcade Controls wiki says a freshly routed slot grips barbed trim without glue, but that slots in old particleboard cabinets are often too loose to hold new trim alone. It describes fitting the trim dry first, marking the corners, then running hot glue in the slot and pressing the trim in a short stretch at a time, with a helper pressing down on sections already placed. Work quickly, because hot glue sets fast, and do not flood the slot, since excess makes future removal harder. Trim excess length with sharp scissors or a blade.
After installation and related fixes
Run a finger along the whole edge and check for gaps, bubbles or sections that lift. Press any lifting spot, and fix it before it grows. If the panel edge was damaged, repair it before trim goes on, using the cabinet restoration guides. The restoration basics guide and the art and cosmetic restoration guide cover the surrounding work, and the DIY parts list shows where trim fits into a build. If you just bought a new cabinet, the first-day setup checks cover inspecting it for shipping damage before you start.
Common T-molding mistakes
- Ordering by width alone without checking the stem and slot
- Hammering with metal, which dents or splits the head
- Overheating the trim near paint or artwork
- Stretching the trim tight around a curve, which can leave it pulling back later
- Skipping the slot repair on swollen or chipped wood
- Cutting the last piece short, leaving a visible gap
Take your time on the first corner, since that is where most people learn the trim's limits. Practice on a spare piece before you start on the cabinet. Measure each run, cut a little long, and trim to fit once the piece is seated. If a corner goes wrong, pull it back out gently, reseat it and use your spare length rather than forcing it.
Frequently asked questions
How do I know what size T-molding my cabinet takes?
Measure the slot width in the panel edge and compare it with the old trim's stem. Ask the seller to confirm the profile if the listing is unclear.
Can I reuse old T-molding?
Usually not if it is cracked, stretched or has lost its grip. Keep it as a size sample instead.
Do I need glue for T-molding?
Not always. Barbed stems usually hold on their own in a good slot. A small amount of compatible adhesive can help a loose fit.
How do I get T-molding around corners?
Plan relief cuts on the back flange for outside corners, and warm the trim gently if needed, keeping heat away from artwork.
What color T-molding should I choose?
Black suits most cabinets and hides wear. Match the original or the artwork if you want a particular look.
Affiliate disclosure: HomeArcadeGuide.com may earn from qualifying purchases through Amazon Associates and eBay Partner Network at no extra cost to you. Manufacturer links in the source section are research references, not tracked endorsements.